Continuing Education Activity
If an ultrasound machine is not immediately available and central venous access via the right jugular vein is required, a simple three-finger technique for insertion of a central venous access line into the right internal jugular vein has proven to be a reliable method for accomplishing this task. This technique works well regardless of the body habitus of the patient or whether the patient can rotate their head to the left. This activity describes the indications, contraindications, and complications associated with the internal jugular line placement and highlights the role of the interprofessional team in ensuring safe venous access.
Objectives:
- Identify the indications for internal jugular vein access.
- Explain how to insert an internal jugular catheter.
- Summarize the complications of internal jugular vein cannulation.
- Describe the importance of collaboration and coordination amongst the interprofessional team to facilitate safe internal jugular vein cannulation and improve patient outcomes.
Introduction
Obtaining central venous access is important in administering a large volume of fluids, monitoring the fluid balance, and in patients in whom peripheral venous access is difficult to obtain and maintain (as in peripheral edema and pediatric patients). If an ultrasound machine is not immediately available and central venous access via the right jugular vein is required, a simple three-finger technique for insertion of a central venous access line into the vein has proven to be a reliable method for accomplishing this task. This technique works well no matter the patient's body habitus or whether the patient can or cannot rotate their head over to their left side. In essence, the practitioner creates the landmarks required for the successful insertion of a central venous catheter by properly positioning their left three fingers on the patient's neck. The complication rate is no higher than other methods commonly used and might be equal to using ultrasound for placement.
Anatomy and Physiology
When looking at the anatomy, emphasize the need to roll off the trachea. Keep the fingers in contact with the trachea. The goal is to get the sternocleidomastoid muscle's medial head to bunch up as much as possible by applying pressure posteriorly with the fingertips versus the fingertips laterally. If the finder needle is inserted and no blood is obtained, one can very slightly redirect the needle more medially without crossing the middle of the muscle. Once the finder needle enters the internal jugular vein, place the larger introducer needle directly over the finder needle and insert it at the same angle as the finder needle.[1]
Indications
Central line catheter insertion indications include emergent and non-emergent reasons. Emergent indications include transvenous pacemaker placement, measurement of right atrial central venous filling pressures or pulmonary capillary wedge pressures, measurement of cardiac output, large volume fluid administration, administration of specific medications such as inotropic medications, cardiac catheterization, emergency or temporary hemodialysis, vascular access in the unstable patient when peripheral intravenous access is not easily attainable, and/or delivery of large volume of fluids.
Non-emergent indications include or administration of total parental nutrition, patients in need of frequent routine blood draw (e.g., someone admitted to the intensive care unit for diabetic ketoacidosis or gastrointestinal bleeding), or patients needing hypertonic saline solutions, large amounts of potassium, or calcium chloride.[2]
Contraindications
Contraindications for central line venous access include severe coagulopathy or thrombocytopenia, an uncooperative or combative patient, or the area of cannulation is contaminated, burned, or traumatized. Additionally, an inexperienced operator should not attempt central line venous access.[3]
Equipment
Most hospitals have standard central venous catheterization kits. In general, sterile kits contain a list of the following items:
- One clear fenestrated plastic drape
- Chlorhexidine antiseptic with applicators
- One small anesthetizing needle (25 gauge by 1 inch)
- One large anesthetizing/finder needle (usually 22 gauge by 1.5 inches)
- One introducer needle (usually 18 gauge by 2.5 inches)
- Five mL syringes
- One J-tip guidewire with housing and straightener sleeve
- One scalpel with a No. 11 blade
- One skin dilator
- One triple lumen catheter or sheath introducer
- Sterile gauze pads
- One suture with a curved needle
- One disposable needle holder
The operator will also need:
- Sterile gloves, sterile gown, cap, and mask with a face shield for each personnel
- Sterile saline suitable for injection
- Sterile dressings
- Local anesthesia or 1% lidocaine[1]
Preparation
Explain risks and benefits, if possible. Risks include infection, pain, local bleeding or hematoma, or pneumothorax/hemothorax. Ideally, the patient should be placed on a cardiac monitor to detect any dysrhythmias triggered while advancing with wire. Sterilize the neck and clavicle area with chlorhexidine. Provide adequate local anesthesia. For the uncooperative patient, consider sedation.
Technique or Treatment
General steps include:
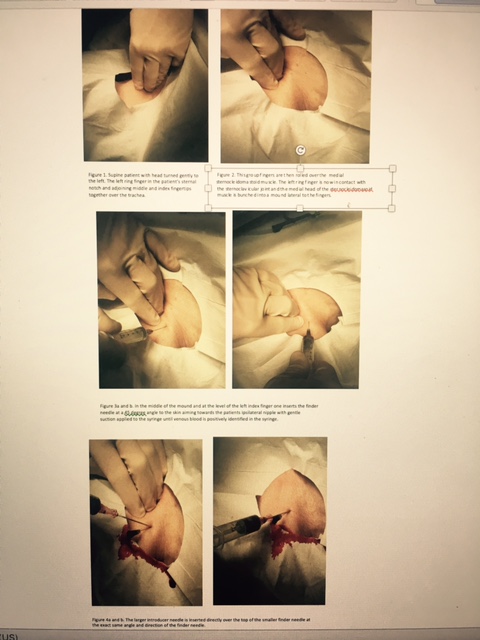
- Place the patient supine with their head turned gently to the left. This central venous access technique via the right jugular vein will be successful no matter how much or how little the head can or cannot be turned. (Fig. 1)
- The practitioner's left ring finger is placed in the patient's sternal notch, and the adjoining middle and index fingertips are brought together such that they are in the midline over the trachea (Fig.2).
- This group of fingers is then rolled over the trachea and down into the space between the trachea and medial head of the medial sternocleidomastoid muscle. The pads of the three fingers must stay in contact with the trachea. When done properly, the left ring finger is now in contact with the sternoclavicular joint. The medial head of the sternocleidomastoid muscle is bunched into a mound lateral to the fingers. (Fig. 3)
- In the middle of the mound and at the level of the left index finger, insert the finder needle at a 45-degree angle to the skin, aiming toward the patient's ipsilateral nipple with gentle suction applied to the syringe. (Fig. 4)
- Once the vein has been entered, and venous blood is positively identified in the syringe, the larger introducer needle is inserted directly over the top of the smaller finder needle at the same angle and direction as the finder needle. (Fig. 5)
- Proceed to place a catheter with the Seldinger technique.
This completes the central venous access via the right jugular vein procedure.
Check the post-procedure chest radiograph or blood gas for proper central venous line catheter placement.[3]
Complications
Knowledgeable of the common complications of accessing the jugular vein still apply with this method. These include carotid artery puncture, subclavian artery puncture, pneumothorax, hematoma formation, extravasation, and hemothorax. Rare complications include pseudoaneurysms, aortic puncture, cardiac tamponade, injury to the vertebral artery, and even death. Arrhythmias can occur if the guidewire contacts the endocardium. Injury to the thoracic duct is not seen with right-sided cannulation of the internal jugular vein.[4][5]
Clinical Significance
Using this method for central venous access via the right jugular vein, one does not require the patient to have easily identifiable landmarks for placement of a jugular catheter as some patients with large or short necks may or may not have.
Although ultrasound is common in central venous access placement, there are specific barriers that still exist, for example, daily utilization at the bedside and limited availability of ultrasound equipment, especially in remote areas. Other barriers include operator comfort level in the use of ultrasound and the perception that using ultrasound will delay the overall time in completing the procedure. This method for central venous access via the right jugular vein is ideal in a setting that does not have ultrasound access.[1]
Enhancing Healthcare Team Outcomes
Internal jugular vein cannulation is done by many healthcare professionals, including the nurse anesthetist. Once the line is inserted, it is the nurse who is in charge of looking after it.[6][2][5] The key with internal jugular line placement is to avoid a pneumothorax, which does add additional morbidity to the patient. Prior to line use, a chest X-ray should be obtained, and the catheter's position confirmed.[7] Today, to prevent line site infection and other complications, most hospitals have a team assigned to insert and monitor these catheters.