Continuing Education Activity
Acute arthritis, particularly monoarthropathy, is a common acute presentation. In regards to the ankle, there is not always a clear etiology for the monoarthropathy by clinical examination alone. To enhance the clinical findings, ankle arthrocentesis can be employed. This activity illustrates the performance of ankle arthrocentesis and reviews the role of the interprofessional team in evaluating and treating patients who undergo ankle arthrocentesis.
Objectives:
- Identify the anatomical structures, indications, and contraindications of performing ankle arthrocentesis.
- Describe the equipment, personnel, preparation, and technique in regards to performing ankle arthrocentesis.
- Review the potential complications and clinical significance of performing ankle arthrocentesis.
- Outline interprofessional team strategies for improving care coordination and communication to advance the performance of ankle arthrocentesis and improve outcomes.
Introduction
Ankle arthrocentesis is an important procedure that can and should be employed to determine the underlying etiology of monoarthropathy of the ankle. There is not always a clear etiology for monoarthropathy of a joint, as the clinical characteristics of the differential often overlap. Proper diagnosis is paramount to ensure the correct management is provided to the patient. The objective information gained by synovial fluid analysis following arthrocentesis can help distinguish between a non-urgent inflammatory process requiring routine anti-inflammatory and pain directed therapy versus an urgent infectious process requiring prompt use of antibiotics and possible surgical intervention.[1][2] Many etiologies of monoarthropathy may be obvious by clinical history (e.g., hemarthrosis from trauma), but when a clear etiology is not present, arthrocentesis should be performed. Obtaining more objective data to ensure correct diagnosis becomes more paramount in the adult population, as the commonly accepted Kocher criteria used for pediatric septic arthritis does not hold true for the adult population.[3] In rare situations, the existence of septic arthritis and crystal-induced arthritis are not mutually exclusive, and arthrocentesis is again paramount for discovering this occurrence.[4] Access to the joint can also be therapeutic by drainage of a painful effusion or by the ability to inject pharmaceuticals locally.
The advent of improved ultrasound imaging has introduced alternative methods for performing arthrocentesis in comparison to the more traditional landmark-guided methods. The use of ultrasound has been shown to increase the confidence of the provider performing the procedure, accuracy appears to be improved with the use of ultrasound though larger studies are needed to determine whether any superiority in successful arthrocentesis is truly present.[5][6][7]
Anatomy and Physiology
The two joint spaces of the ankle that are routinely involved in arthrocentesis are the subtalar joint and the tibiotalar joint.
Two tarsal bones form the subtalar joint. It is formed by the inferior surface of the talus and the superior surface of the calcaneus. The joint capsule is supported by the posterior talocalcaneal, medial talocalcaneal, and lateral talocalcaneal ligaments.[8] Access to subtalar joint effusions involves the anatomical structures of the lateral malleolus and sinus tarsus.[1]
The two long bones of the lower leg and a tarsal bone form the tibiotalar joint. It is formed by the superior surface of the talus, the mortise formed by the distal end of the tibia and fibula. The joint capsule is supported by three sets/groups of ligaments: tibiofibular syndesmosis, medial/deltoid collateral ligaments, and the lateral collateral ligaments.[9] Access to tibiotalar joint effusions involves the anatomical structures of the medial malleolus, extensor hallucis longus tendon, and tibialis anterior tendon.[2][5][1]
Indications
Indications for diagnostic arthrocentesis include the suspicion for septic vs. crystal-induced arthritis, arthritis with synovial effusion of unknown etiology, and for evaluation of septic arthritis response to therapy. Indications for therapeutic arthrocentesis include drainage of suspected septic arthritis, pain relief by joint pressure reduction, and con-current ability to inject intraarticular medications.[2][4]
Contraindications
A widely accepted contraindication to ankle arthrocentesis is the presence of overlying skin or soft tissue infection. Other contraindications are relative and commonly related to concurrent therapeutic injection of intraarticular corticosteroids. These include septic arthritis that is suspected or proven, multiple previous short-term corticosteroid injections, intraarticular fracture, juxta-articular osteopenia, instability of the joint, and inability to rest the joint following the procedure.[2][1]
Personnel
A skilled provider may reasonably be able to perform this procedure alone; however, assistance with the ultrasound or collection tubes may reduce the difficulty and enhance the success of the procedure.
Preparation
As with any procedure, informed consent with a discussion of routine risks and benefits that are present any time the skin and a joint are violated should be obtained.
The patient should be supine or in a reclined position to allow easy access to the anterior region of the ankle in addition to reducing any weight-bearing on the ankle. This positioning will allow for maximum joint space to be present during the procedure.
The cutaneous region over the desired joint to be accessed should be adequately cleaned by the use of optional alcohol wipe/swab or option of preps listed above. Cutaneous analgesia can then be obtained with the use of the 1% lidocaine and the 1 ml syringe.
Technique or Treatment
Subtalar Joint Without Ultrasound Guidance
The foot is positioned so a view of the lateral aspect of the ankle can be obtained. With the foot in perpendicular position relative to the leg, palpate inferior and anterior to the distal tip of the lateral malleolus. When the depression in this region, associated with sinus tarsi, is palpated, a marking can be made. Cleaning of the area and cutaneous analgesia of the region can be done at this point.
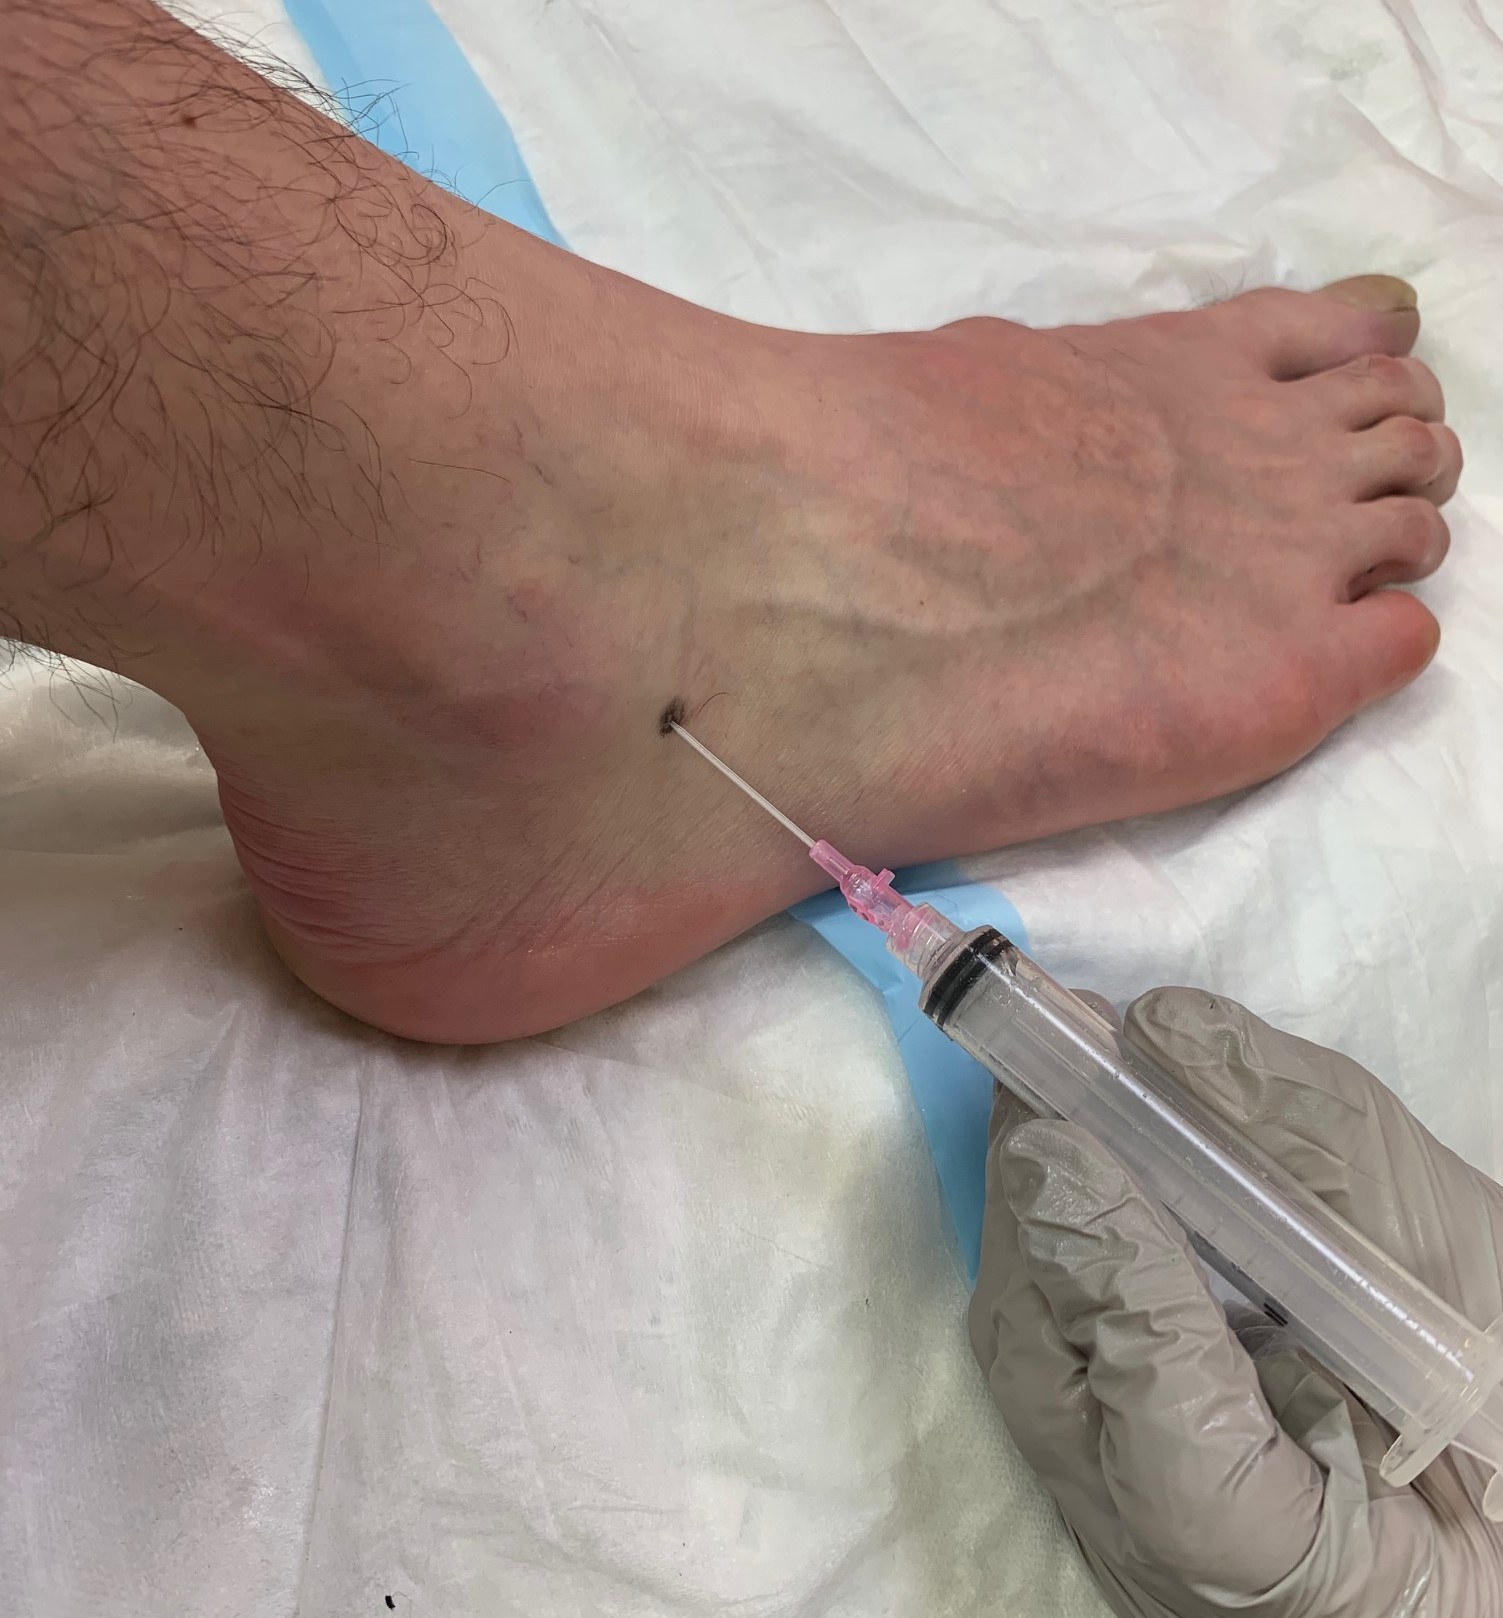
Next, with the 20-gauge needle attached to the end of an empty 10 ml syringe, the joint is entered by directing the needle horizontally across the ankle while keeping it in line with the lateral malleolus (see media item 1).[1]
Keeping negative pressure on the syringe plunger during this process and feeling for the subtle pop of penetrating the synovial membrane will allow the physician to known when the joint has been accessed. The presence of synovial fluid in the syringe should indicate success. Draining of effusion and/or injection of medication can commence at this point in the procedure. Due to the limited size of the ankle joints, switching of syringes to continue removing effusion after the syringe is full will rarely be required.
Pressure with gauze should be applied to the skin after withdrawing the needle, which can be followed by an adhesive bandage/dressing.
Subtalar Joint With Ultrasound Guidance
The foot is positioned so a view of the lateral aspect of the ankle can be obtained. With the foot in perpendicular position relative to the leg, palpate anterior to the distal tip of the lateral malleolus. The ultrasound transducer can then be placed in short axis to the foot just anterior to the lateral malleolus directly over the sinus tarsi. The image on the screen should show the echogenic talus on one side of the screen and the echogenic calcaneus on the other side with the sinus tarsi residing in between. Cleaning of the area and cutaneous analgesia of the region can be done at this point.
Next, with the 20-gauge needle attached to the end of an empty 10 ml syringe, the joint is entered by directing the needle posteromedial towards the sinus tarsi keeping the needle horizontally across the ankle in line with the lateral malleolus (see media item 2).[10][11] The rest of the procedure is the same as detailed above for the subtalar joint without ultrasound guidance.
Tibiotalar Joint Without Ultrasound Guidance
The foot is positioned, so a view of the anteromedial aspect of the ankle can be obtained. With the foot in perpendicular position relative to the leg, palpate approximately 1 cm anterior to the distal tip of the medial malleolus. Keeping posterior and medial to the extensor hallucis longus and tibialis anterior tendons (can be made easier to palpate with asking the patient to dorsiflex their great toe), a marking can be made between the palpated medial malleolus and tendons. Cleaning of the area and cutaneous analgesia of the region can be done at this point. Next, with the 20-gauge needle attached to the end of an empty 10 ml syringe, the joint is entered by directing the needle in a slightly posterolateral direction across the ankle while keeping it in relative parallel relation with the dorsum of the foot, the horizontal plane of the tibiotalar joint (see media item 3).[2][5] The rest of the procedure is the same as detailed above for the subtalar joint without ultrasound guidance.
Tibiotalar Joint With Ultrasound Guidance
Placement of the ultrasound transducer should be longitudinal and just lateral to the extensor hallucis longus and tibialis anterior tendons. Setting the ultrasound depth to approximately 4 cm should provide a view of the anterior surface of the tibia on one side and the curving dome of the talus on the other side. The desired tibiotalar joint resides between these two bony landmarks (see media item 4). The entrance with the syringe into the joint is performed in the same manner as is done without the ultrasound and detailed above. The location at which to enter the skin with the syringe can be made more precise with the use of the ultrasound image to guide how proximal or distal on the ankle to enter the skin.[5] Fanning of the ultrasound transducer will allow the operator to visualize the entrance of the needle into the desired joint space. The rest of the procedure is the same as detailed above for the subtalar joint without ultrasound guidance.
Proper Disposition of Synovial Fluid for all Methods of Collection
- Sterile tube: Send for culture for aerobic bacteria, anaerobic bacteria, and fungi
- EDTA or heparinized tube: Send for white blood cell count with differential
- Fluoride tube: Send for glucose level
- Clear glass tube: for visual inspection and any other indicated studies
- Slides: Order for gram stains to be performed and polarized light microscopy for crystal examination
Complications
Potential complications as follows:
- Iatrogenic joint infection (1 to 2 per 25,000 arthrocenteses)[2][1]
- Soft tissue and surrounding structure damage (tendon, nerves, and blood vessels)[2][1]
- Inability to successfully obtain access to the desired joint (ensure adequate necessary analgesia). Success may improve with the use of ultrasound guidance.
- Inadvertent extra-synovial injection (soft-tissue or intravascular) if an injection of medication is employed with the procedure
Clinical Significance
Because of the overlapping features that many etiologies of monoarthropathy present, arthrocentesis of the ankle may be necessary for evaluation and proper treatment. The use of ultrasound-guided versus landmark guided technique alone may enhance the confidence of the physician and possibly the success of the procedure.
Enhancing Healthcare Team Outcomes
Ankle arthrocentesis requires an interprofessional team effort involving a variety of physician specialties (emergency medicine, hospitalist, orthopedist, etc.) in addition to laboratory personnel and nursing staff. All of these individuals are essential in helping to obtain, maintain, and evaluate the synovial samples to make the appropriate diagnosis. As with any other procedure that violates the skin and/or synovial capsule, the risk of seeding infection is always present, so care should be made to thoroughly evaluate the overlying cutaneous skin for the presence of skin and soft tissue infections. Meticulous records of the procedure and/or administered medications are requisite. The performing physician should work with nursing staff to coordinate obtaining the proper supplies, recording of the steps performed, and transportation of the obtained samples to the laboratory for analysis. Physicians should be cognizant of contraindications that may exist to the administration of some medications commonly used with this procedure (e.g., corticosteroids not routinely recommended for use in patients with uncontrolled diabetes). A system for prompt reporting of critical, abnormal laboratory results by pathology should be in place. Prompt consultation to surgical specialists for any diagnosis necessitating urgent/emergent intervention should be the norm. An interprofessional approach will help obtain the desired outcomes of this procedure.[Level 5]