Continuing Education Activity
Ultrasound (US) is a valuable adjunct for procedural guidance when performing arthrocentesis, allowing the user to identify and aspirate joint effusions reliably. This article outlines the use of US guidance when performing arthrocentesis, highlighting its role with the interprofessional team when using this procedure for both its diagnostic and therapeutic purposes.
Objectives:
- Review indications and contraindications for performing US-guided arthrocentesis.
- Describe the equipment and technique required for using the US as an adjunct.
- Identify relevant anatomical structures on US imaging.
- Outline proper probe placement and technique by the interprofessional team when evaluating for effusions.
Introduction
Acute monoarticular arthropathies are a common source for Emergency Department (ED) visits, with septic arthritis alone having an annual incidence of 10 per 100,000 patients in the United States.[1] In the ED, the most critical of these arthropathies to diagnose and treat is septic arthritis. While lab values and vital signs may assist with the diagnosis of septic arthritis, the gold standard test is done via analysis of the synovial fluid following arthrocentesis. If the synovial fluid sample is concerning for septic arthritis, the patient should then be started on intravenous antibiotics, and orthopedics should be immediately consulted.[2]
Arthrocentesis is a common procedure that is frequently performed in the ED as it has both diagnostic and therapeutic value. Traditionally, arthrocentesis was performed blindly using critical landmarks to aspirate effusions for comfort or diagnosis. However, using a landmark-based approach has some limitations due to variance in anatomy and effusion, with success rates ranging from 61 to 78% depending on the joint that is being assessed.[3][4][5][6] Ultrasonography has been adopted as an adjunct for many emergent and urgent procedures, including arthrocentesis, as it adds some distinct advantages over a blind landmark-based approach.[7][8]
The primary advantage of ultrasound (US) guided arthrocentesis offers the user direct visualization of the effusion. By visualizing the effusion and using an in-plane or out-of-plane needle technique, the clinician can perform arthrocentesis with greater accuracy and fewer attempts.[5][8] Additionally, US-guided arthrocentesis can detect small effusions that potentially would not be assessed using a landmark-based technique due to an inability to aspirate small volume effusions. It has been found that the US can detect effusions as small as 4 ml of fluid in the joint space.[9][10] Finally, studies have demonstrated that the US-guided arthrocentesis techniques allow the clinician to aspirate more volume and decrease a patient’s perceived pain scores during the procedure.[8] Critically, the adoption of the US as an adjunct to arthrocentesis has also been shown to lead to quicker time to diagnosis and management of septic arthritis.[11]
While perhaps intuitive, many of the aforementioned advantages make US-guided arthrocentesis relevant for managing arthropathies in the pediatric population. Pediatric patients will inherently have smaller joints, smaller joint effusion sizes, and potentially be less able to tolerate the discomfort during the procedure. Effusion detection with the US has been shown to have a diagnostic sensitivity and specificity of 80 and 90%, respectively. The overall sensitivity and specificity of US for the diagnosis of effusion in the pediatric population must be determined. Still, the assessment of the hip demonstrates the potential for US application in the assessment of pediatric arthropathy. Beyond diagnosis, multiple case reports have shown that US-guided arthrocentesis can be safely performed in the pediatric hip and knee.[12][13]
While the literature is more robust at this time for the adult population, in general, US-guided arthrocentesis techniques may be used at most major joints of the body. Discussed below are common US-guided arthrocentesis techniques for all of the major joints of the upper and lower extremity. Some of the described techniques will have technical variations in the literature (i.e., in-plane vs. the out-of-plane US-guided arthrocentesis). This article will discuss the authors’ preferred approach, but additional techniques are in the literature. Finally, while this article focuses on using the US as an adjunct for arthrocentesis, many of these same techniques may be utilized for intra-articular joint injections in the appropriate clinical setting.[14][15][16]
Indications
The indications for US-guided arthrocentesis are the same as those for arthrocentesis. These include the following: diagnosis of septic arthritis, diagnosis of inflammatory diseases, administration of medications into the joint space, evaluating for hemarthrosis, and assessing for synovial stability after penetrating injuries.[1][17]
Contraindications
An absolute contraindication to this procedure is cellulitis at the site of the needle penetration, as this may introduce bacteria into the joint space. Other relative contraindications include bacteremia, coagulopathy, and joint prosthesis.
Personnel
A single operator can perform this procedure without an assistant; however, having another team member may be beneficial to assist with patient care, equipment failure, handling the US probe before the sterile cover being placed, and/or documentation of the procedure.
Preparation
Ensure that all equipment is at the bedside and that the US machine is equipped with an appropriate probe for the joint evaluation. Typically, arthrocentesis will be performed with a high-frequency linear probe, but there are circumstances where a curvilinear probe (low frequency) may be preferable. The advantage of a high-frequency linear transducer is that the high frequency provides greater resolution and detail of the surrounding soft tissue. However, when deeper tissue penetration is required, or a wide-needle approach is needed, a low-frequency curvilinear probe is acceptable.
Patient positioning is variable based on the joint being aspirated and is often technique-dependent. Therefore, it may be helpful to administer analgesics and/or anxiolytics before beginning the arthrocentesis procedure. After all, the equipment has been gathered for the procedure, and the clinician should sterilize the joint of interest with betadine or chlorhexidine. Once the site of arthrocentesis has been sterilized and draped, a sterile probe cover with sterile gel should be used to maintain the sterility of the procedure.
Technique or Treatment
There are several common US-guided techniques for arthrocentesis. Included are several in-plane and out-of-plane techniques. For convention, in-plane refers to a position with the needle directly below the US transducer with the full length of the needle in constant view on the US screen. Out-of-plane technique refers to a US view in which a portion of the needle, ideally the tip, will be visualized on the US screen. For the out-of-plane technique, the needle will be perpendicular to the US probe and inserted at a steep angle with triangulation to introduce the needle tip at a depth of the effusion as seen on the US screen. A general rule to adhere to with the out-of-plane technique is that the needle tip should never be advanced beyond the probe. If this occurs, the operator should halt the movement of the needle and slowly slide the probe away from the needle. This maneuver will cause the visualized portion of the needle to disappear from the US window. At this point, the operator should then slowly slide back towards the needle so that the needle tip is identified. All of these adjustments should be made while maintaining the same orientation of the US probe.
Below are the authors’ recommendations for US-guided techniques for arthrocentesis of the ankle, elbow, hip, knee, shoulder, and wrist. Please note that there are variations to these suggested techniques in the literature.
Ankle Arthrocentesis
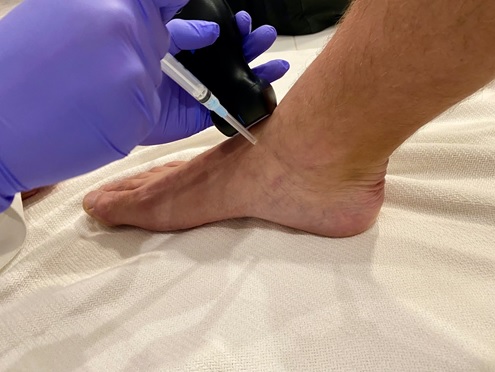
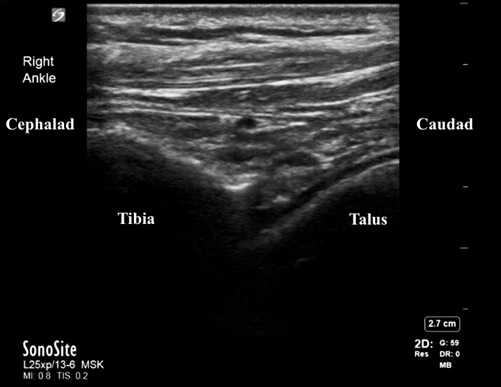
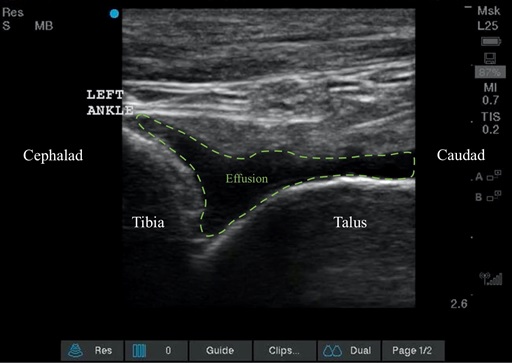
Begin by identifying the anatomical landmarks; the tibialis anterior tendon and the medial malleolus. Place the probe with the marker cephalad, identifying the tibia on the US screen, and then slide the probe distally until the space between the tibia and the talus is found. While maintaining this orientation, move the probe slightly medial so that it is between the tibialis anterior tendon and the medial malleolus. Using an out-of-plane approach, insert the needle at a steep angle adjacent to the middle of the probe. Begin aspirating once the needle tip is seen within the effusion.
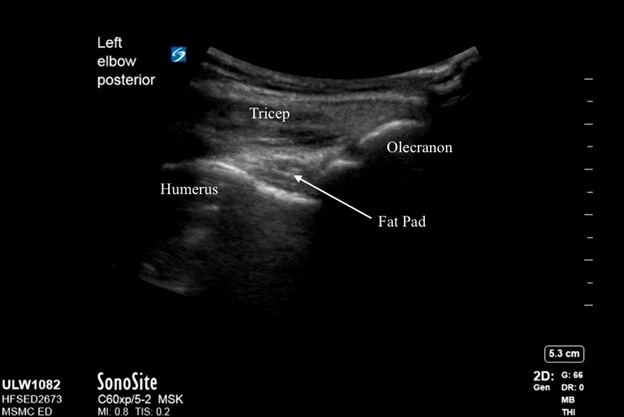
Elbow Arthrocentesis
Place the patient’s elbow in 90 degrees of flexion while the arm is resting on a table. Place the US probe in a longitudinal axis at the distal humerus. This position should allow the clinician to visualize the triceps muscle/tendon, the posterior fat pad, the distal humerus, and the proximal ulna or olecranon fossa. The clinician should assess for effusion below the triceps tendon in the olecranon fossa from this longitudinal position. If an effusion is identified, the probe can rotate 90 degrees into a transverse or short-axis view. In this view, the triceps tendon is visualized in a transverse plane, and the effusion should be located below the tendon. Once in this position, freeze the US image and approximate the depth of needle entry by measuring from the probe to the effusion. This is the depth that the needle should be inserted lateral to medial. The needle can then be inserted at the appropriate depth in a flat approach using an in-plane US technique. The needle approach should be seen approaching lateral to medial, with the needle advancing towards the effusion in the olecranon fossa. Given the flat and parallel approach, the needle tip should be easily seen for the duration of the procedure. [18]
Hip Arthrocentesis
The US machine should be at the head of the bed before setting up for arthrocentesis. Following the procedure set up, the probe should be placed on the inguinal groove with the probe marker always to the patient’s anatomic right. This positioning will give a US window that should include the femoral nerve, artery, and vein in the near field and the femoral head and neck in the far-field. At this point, rotate the probe so that the inferior or medial portion of the probe faces the umbilicus. For a right-sided hip arthrocentesis, the non-probe marker side will point towards the umbilicus, and for a left-sided hip arthrocentesis, the side with the probe marker will point towards the umbilicus. This convention will make anatomical sense when performing hip arthrocentesis using an in-plane approach from the lateral aspect regardless of the side of this hip.
The clinician should now see the femoral head, femoral neck, anterior synovial recess, and the iliofemoral ligament on the US screen from this rotated view. These important landmarks must be identified before attempting arthrocentesis. After the landmarks are identified, insert the needle in a longitudinal approach directly below the transducer. As this is an in-plane US technique, the needle should be visualized throughout the procedure. The needle tip should be advanced into the anterior synovial recess. As the needle enters into the anterior synovial recess, begin to aspirate the effusion.[19][20]
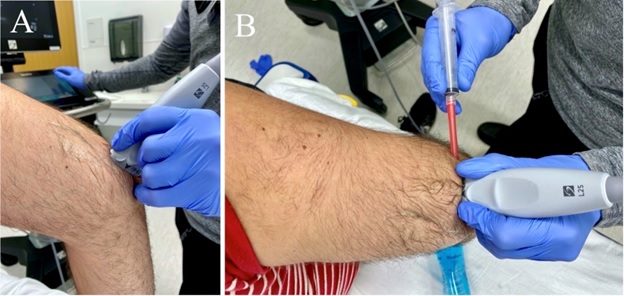
Knee Arthrocentesis
Place the probe above the patella with the probe marker in a cephalad position; this view should aid in locating the effusion. The US window should include the superior portion of the patella, the quadriceps femoris tendon (long axis), fat pad, and femur. The effusion will be located below the quadriceps tendon and above the femur. While the echo signal will vary depending on the type of effusion, it will typically appear as a hypoechoic fluid space. From this longitudinal position above the patella, rotate the probe 90 degrees into a transverse view so that the marker faces the patient's right side. Freeze the US image and approximate the depth of needle entry by measuring from the probe to the effusion. This is the depth that the needle should be inserted lateral to medial. The needle should be advanced in a flat and parallel approach at the measured depth using an in-plane US technique. Continue to advance the needle into the suprapatellar space. The needle tip should be seen advancing into the effusion below the quadriceps tendon. Be sure to avoid the fat pad while aspirating, as this will cause discomfort during the procedure.
Shoulder Arthrocentesis
The US-guided arthrocentesis of the shoulder is typically performed from the posterior glenohumeral view. This view allows for an easy and reliable assessment of the synovial joint between the glenoid fossa and humeral head. To correctly position the probe in the posterior glenohumeral view, first, palpate the scapular spine along the lateral portion where the humerus and glenoid fossa meet. Next, place the linear or curvilinear transducer directly below the palpated spine of the scapula in a parallel fashion. The probe marker will typically be positioned to the operator’s left as this will make for easy positional awareness with the US. The patient should be positioned upright / sitting with the US machine adjacent or in front of the patient on the side of the affected shoulder with the screen facing posteriorly. The physician should be standing behind the patient, looking towards the US screen. This allows for easy interpretation of position, and thus the probe marker should face to the left of the screen regardless of laterality if the physician is behind the patient.
Once the probe has been positioned under the spine of the scapula, slide laterally until the scapular notch is seen, followed by the glenoid and humeral head. This view allows for evaluation of a shoulder effusion as well as shoulder dislocations.[21][22] If an effusion is noted, place the effusion in the center of the US window while maintaining the posterior glenohumeral view. Aspiration can then be performed via an out-of-plane approach by inserting the needle at a steep angle at the center of the side of the US probe. The needle tip should be triangulated to the depth of the effusion in the glenohumeral space. The needle tip should emerge into the effusion on the US window if the posterior glenohumeral view is maintained and while the needle tip is slowly advanced towards the middle of the probe.
Wrist Arthrocentesis
Place the patient with their wrist on a towel with the palmar surface down so it is held in a slightly flexed position. Place the transducer with the probe marker facing laterally towards the ulnar aspect. This view should include listers tubercle on the distal radius, the extensor carpi radialis brevis tendon, and the extensor carpi radialis longus. Then rotate the US approximately 90 degrees so that the probe is positioned longitudinally along the radius; the scaphoid and radius, or the radioscaphoid joint, should now be in view. Using a steep angle, enter the area in an out-of-plane approach between listers tubercle and the extensor carpi radialis brevis. The needle tip will emerge into the effusion, and aspiration should then be performed.
Complications
While rare, some complications can be associated with US-guided arthrocentesis.
- Infection. This procedure must be done entirely with an aseptic technique to avoid introducing bacteria into the sterile joint space. To limit this, patients must be draped and prepped in the typical sterile fashion and avoid inserting a needle through infected skin. In addition, the US should be covered in a sterile ultrasound cover, and sterile gel should be used during the procedure.
- Bleeding. Hemarthrosis is rare during arthrocentesis but can be seen in patients with coagulopathies, such as those taking anticoagulants. Care should be taken when inserting the needle, avoiding side-to-side motions to avoid shearing the structures around the joint space and the blood vessels.
Clinical Significance
Arthrocentesis is a versatile procedure with both diagnostic and therapeutic value. US guidance provides visualization of the important anatomy, pathology, and needle when performing arthrocentesis. As mentioned above, US-guided arthrocentesis has several key advantages to the landmark-based techniques. These advantages are: the ability to aspirate small volume effusions for evaluation, aspiration of larger volumes from the joint, improved speed to diagnosis, decreased pain during the procedure, and improved safety by avoiding important neurovascular, cartilaginous, and ligamentous structures.
A perhaps hidden benefit of US-guided arthrocentesis is that it also allows for real-time documentation of the procedure if the US video is stored as part of the medical record. These advantages make US-guided arthrocentesis the technique of choice when the US is available. Furthermore, the US-guided technique will likely increase the clinician's confidence and encourage arthrocentesis when clinically warranted.[5]
Enhancing Healthcare Team Outcomes
Following aspiration, it is important to communicate fluid analysis orders with the nursing and laboratory staff to ensure time fluid analysis. Having this open communication amongst the medical staff caring for the patient will prevent medical errors, procedural errors, and delays in patient care. Furthermore, it has been demonstrated that clear interprofessional communication amongst physicians, nurses, pharmacists, and other professionals is associated with shorter lengths of stay and reduced hospital charges. In managing monoarticular arthropathies, appropriately consulting orthopedic surgeons, infectious disease physicians, internal medicine physicians, and pharmacists while fully engaging the involved medical staff is essential to improving patient outcomes and healthcare processes.[23]