Continuing Education Activity
Fluoroscopy of the foot is vital to the evaluation, diagnosis, and treatment of patients with foot and ankle pathology. There are patient positioning methods and techniques that provide the health care professional with more precise images that assist in diagnosis and treatment. Understanding these techniques and positioning tips can help locate an accurate location and treat the area of injury with an injection or other indicated treatment option. This activity reviews fluoroscopic imaging of the foot and explains how the interprofessional team can use fluoroscopic evaluation to treat patients with foot and ankle pathology.
Objectives:
- Outline indications, technique, and identification of Lisfranc ligament injury using fluoroscopy.
- Identify anatomic structures at risk with injections of the foot.
- Describe how to perform basic imaging of the foot.
- Explain how to perform the fluoroscopic evaluation of the subtalar joint by an interprofessional team.
Introduction
Fluoroscopy is using the C-arm to get live or static images of the foot. This can be used in the clinic or in the operating room. There are multiple reasons to use fluoroscopy procedures in the assessment of the foot. Diagnostic injections into the multiple joints of the foot, stress examinations to evaluate for ligamentous instability, and intra-operative evaluation of deformity correction are all examples of reasons to use fluoroscopy.
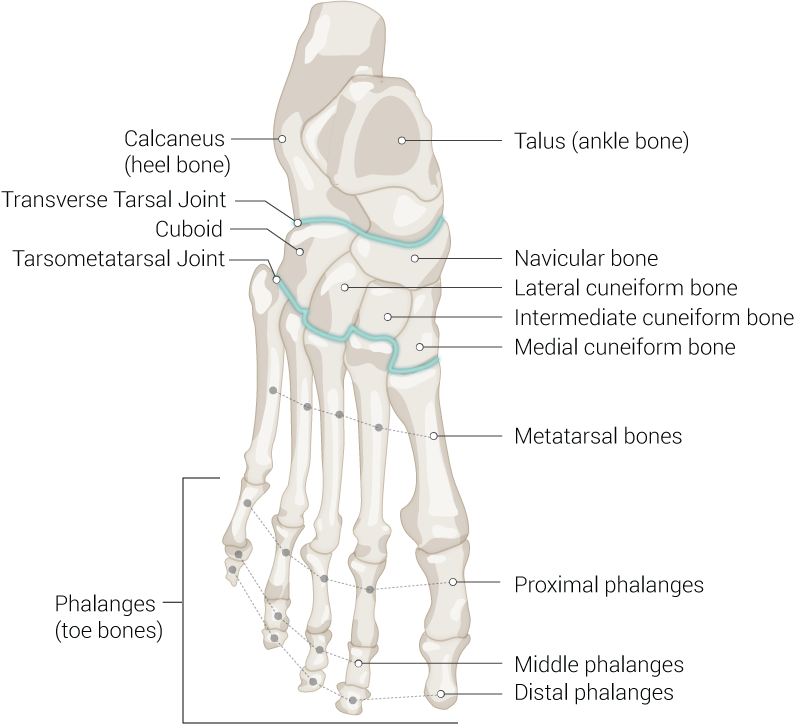
The anatomy of the foot involves 30 joints and 26 bones that can be difficult to identify from surface landmarks alone. Using fluoroscopy and positioning the foot correctly, you can accurately identify your location.
Anatomy and Physiology
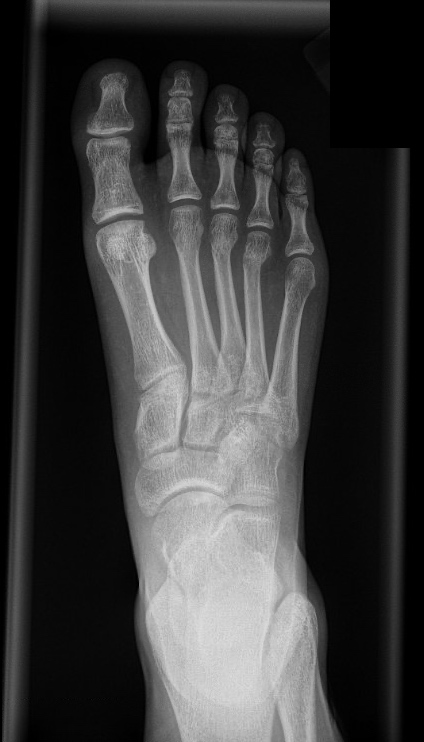
The initial imaging exam of the foot is an anterior to posterior (AP) radiograph, lateral foot radiograph, and oblique foot radiograph. For an AP radiograph, the foot can be placed plantigrade on the bed while the patient is supine by flexing the knee and hip. The X-ray beam is then directed at approximately 10 degrees caudal. This view will allow visualization of the first and second tarsometatarsal joint and medial and middle cuneiforms, metatarsals, and phalanges and a stacked view of the lateral column of the foot.
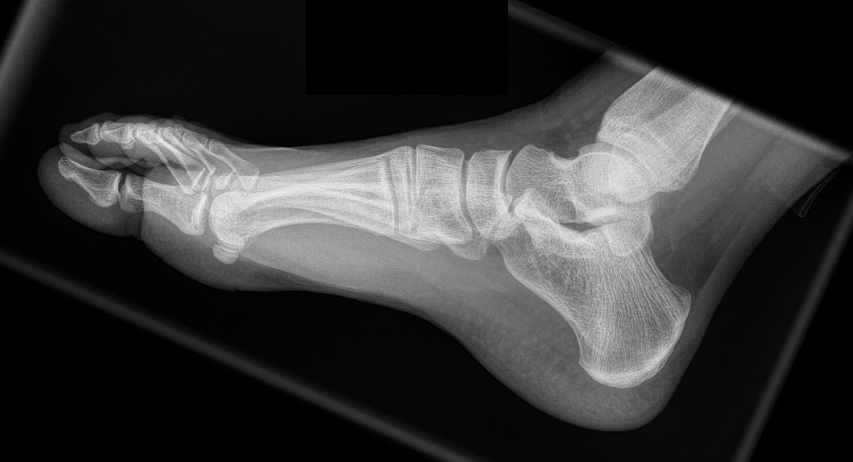
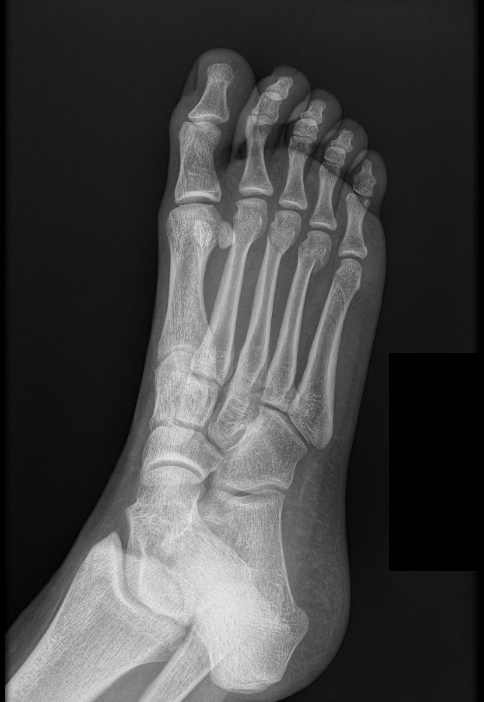
To obtain an oblique foot image, you leave the foot positioned as described for the AP view and angle the X-ray beam 30 to 40 degrees lateral or inverting the foot. The oblique view gives a better image of the lateral midfoot and forefoot. The lateral foot projection can be made with the foot placed as described above. The X-ray beam is positioned 90 degrees lateral with the plate on the side of the foot, or you could position the patient supine with the foot propped up away from the contralateral leg or contralateral leg flexed to get out of the view and angle beam 90 degrees from the foot. The beam should be centered around the midfoot at the base of the metatarsals. If you are primarily looking at the medial column of the foot, you can do an external oblique, also called the medial oblique. To position, you externally rotate the foot and ankle and lift the medial column of the foot toward the X-ray source.[1]
For evaluation of the calcaneus, you would need a lateral view of the calcaneus and a harris axial view to get orthogonal imaging and appropriately view the joints. The lateral view is where you measure Bohler's angle. To get this view, you have the patient supine and roll onto the affected side with the leg and foot externally rotated until the foot is parallel to the table. Then, center the beam at the midfoot to make sure the foot is in slight dorsiflexion, and the planter foot should be perpendicular to the plate. This allows visualization of the talocalcaneal and calcaneocuboid joints. The Harris view is an axial view of the calcaneus. This can be done with the patient weight-bearing by having them stand on the plate with the ankle dorsiflexed to about 40 degrees. To get the ankle dorsiflexed, the patient will have to flex the knee and hip slightly. Aim the X-ray beam from posterior to anterior approximately 2 cm cephalad to the calcaneus with the beam angled 40 degrees. This should give you an axial view of the calcaneus tuberosity to assess for varus and valgus alignment, as well as visualization of the posterior and middle subtalar articulation. This can be done in the operating room with the patient prone or supine by dorsiflexing the ankle and angling the X-ray beam at 40 degrees.[2]
Additional views of the hindfoot include the Broden view, which allows visualization of the subtalar joint and any associated pathology. The subtalar joint has 3 facets anterior, middle, and posterior in different planes. The patient is positioned supine with the foot internally rotated 45 degrees. Then multiple views taken starting with the X-ray beam angled cranially at 10, then 20, 30, and 40 degrees with the beam centered at the ankle joint.[3]
To evaluate the talus neck and anterior calcaneus process, the canale view can be obtained. The patient will be supine or laying on their side with the ankle plantarflexed with the foot internally rotated 15 degrees. The beam is then angled about 25 degrees caudal.
For the sesamoid X-ray view, you want to get an axial view of the fibular and tibial sesamoids under the first metatarsal head. You can view the sesamoid position on AP X-ray, but this has been shown to not be as reliable as the tangential view.[4] There are 2 techniques to do this non-weight-bearing, one with the patient supine and the other prone. You want the toes extended to bring the phalanges out of view and bring the sesamoids into the profile. The first position is patient prone with the toes on the table/X-ray plate flexed and the X-ray beam directed parallel to the bottom of the foot. The second option is the patient supine knee extended and ankle plantar-flexed approximately 10 degrees with a sheet or string under the toes holding them in the extended position. The X-ray plate is under the heel with the X-ray beam 90 degrees from the plate. You can also obtain a weight-bearing X-ray of the sesamoids by placing a plate 90 degrees to the floor and the X-ray beam horizontal to the ground. Place the foot and toes directly behind the plate with a roll or towels underneath the toes to hold them in the extended position and the knee flexed and plantar surface of the midfoot and hindfoot 45 degrees off the floor.[5] The tangential or axial view of the sesamoids can be different based on the great toe's dorsiflexion. It is important to be mindful of this positioning when interpretation is performed.[6]
It is important to understand the soft tissue anatomy around the sesamoid complex that is not visible on X-ray. In particular, the plantar plate at the plantar surface of the metatarsal phalangeal joint. The plantar plate provides metatarsal phalangeal joint stability. It can be injured with an axial load with the MTP joint in flexion. The plantar plate is a part of the sesamoid complex. Injury ranges from partial to complete tear. When there is a complete plantar plate tear, this causes proximal migration of the sesamoids that can be visible on X-ray.[7]
Indications
Lisfranc ligament injury can be difficult to diagnose, especially if there is no obvious fracture. One of the ways to evaluate for Lisfranc injury involves a fluoroscopic stress exam. Indications are midfoot pain after injury with possible associated plantar ecchymosis or swelling. There also must not be an obvious widening of the first and second metatarsal space and no obvious fracture or displacement.
Intraoperative fluoroscopic imaging is helpful for the evaluation of reduction of hallux valgus deformity. Elliot et al. showed that intraoperative fluoroscopy reliably represented the post-operative weight-bearing radiographs. Gutteck et al. also found that intraoperative fluoro during correction of hallux valgus showed similar correction of intermetatarsal angles and hallux valgus angles compared to post-op imaging at 8 weeks and 3 months. This means intra-operative fluoroscopic imaging can reliably provide a view of final correction, allowing for any corrections to be made during surgery. It is necessary to view a lateral of the foot post hallux valgus correction to make sure the first ray is not dorsiflexed as this could lead to post-op pain and metatarsalgia.[8]
Another use of fluoroscopy in foot pathology is the localization of pain. This can be done with a diagnostic injection of local anesthetic and steroid. You inject at the area of presumed pathology or point of maximal pain and use the post-injection clinical findings to confirm and document precise locations of the injections.[9] It is important to use clinical history and physical exam to localize pain to a suspected area/joint before injection. Targeted injections under fluoroscopic guidance are an easily performed procedure that can offer pain management and information for more accurate treatment, such as where arthrodesis should be performed.[10]
Plantar plate tear of the first MTP joint also called turf toe when acutely traumatic, is a condition that can be diagnosed with fluoroscopy. Patients can present with great toe MTP stiffness, pain, swelling, usually after an axial load with the MTP joint in dorsiflexion.[11] Plantar plate injury can be treated nonoperatively if it is not a complete tear, but if the tear is complete needs timely operative repair. A practitioner can get a lateral view of the forefoot with sesamoids visible. If they do not move distally with dorsiflexion of the great toe, this helps to diagnose a plantar plate tear.[7]
Contraindications
Contraindications to a fluoroscopic exam of the Lisfranc ligament include obvious ligament disruption and/or fractures. If either is present, no further diagnostic exam is needed.
For fluoroscopic guided injections, a contraindication would be any local sign of infection such as erythema or abscess. This could lead to the spread of superficial infection to a joint. Another contraindication is any patient allergies to the steroid or local anesthetic being injected.
Equipment
For all of the above, a C-arm will be needed, and sometimes a sheet or towel is required to help with positioning.
For injections, you will need standard sterilization swabs/solution, a 3-5 cc syringe, a 25 gauge needle, and the steroid and local anesthetic of the clinician's choice.
Personnel
The only required personnel is the practitioner performing the procedure. However, it would be helpful to have an assistant hand you sterile instruments or adjust your C arm while you are remaining sterile for an injection.
Preparation
It is important to position the patient, fluoroscopy machine, and screen so that you don’t have to move to see or take the images.
Technique or Treatment
Technical considerations for fluoroscopic guided injections are described below. 25 gauge needle is superior because of the small joint space. Using sterile technique under fluoroscopy, use the needle alone to start and superimpose it over the joint to guide entry point, then direct needle under X-ray guidance into the joint space desired. This provides evidence that the injection is in the correct area. The clinician uses a combination of the imaging with a tactile feel to guide the needle. The clinician will often feel the hard stop of bone, then pull back, readjust and then feel the resistance, then give after going through a joint capsule. The small joints, such as metatarsophalangeal joints, only hold 1 to 1.5 mL of fluid, so it is imperative to use both tactile and imaging to confirm accurate placement. Once the needle is in position, then the clinician can attach the injection and proceed with the injection. This use of the needle alone for direction allows for easier imaging and direction of the needle compared to the syringe attached to the needle. Following are some common joint-specific injection positioning and structures at risk.
One must avoid the dorsalis pedis artery with the first, second, and third TMT joint injections for the tarsometatarsal joints. These can be done with the patient supine and knee bent with the foot flat on the table, approaching from the dorsal surface of the foot. To better visualize the fourth and fifth metatarsals, have the patient lay on their side, and the foot is internally rotated, allowing better visualization of the TMT joints. The posterior, middle, and anterior subtalar joint facets can be injected by having the patient lay on their side and internally rotating the foot; the approach is from the lateral side of the foot, and one needs to be aware of the peroneal tendons. Also, be mindful that the posterior subtalar joint does not communicate with the middle and anterior facets.
To inject the metatarsophalangeal joints, position the patient supine with the knee bent and foot flat, approach from dorsal medial or lateral to avoid the extensor tendons. It is also easier if you approach from an angle and aim distal to avoid the lip of the proximal phalanx. The interphalangeal joints can be positioned the same as the MTP injection and approached from dorsal medial/lateral to avoid the extensor tendons.[12]
The abduction pronation stress exam is a technique to evaluate the Lisfranc ligament integrity in the setting of injury with no obvious fracture or first TMT joint widening. To perform the X-ray image focused on AP of the foot, obtain a neutral X-ray, then apply an abduction and pronation stress to the forefoot while holding the hindfoot at neutral and look at the space between the first and second metatarsals for widening.[13] It can be compared to the pre-stress and/or contralateral foot X-ray, or any measurement showing greater than 2 mm widening indicates Lisfranc ligament injury.[14]
To assess for great toe plantar plate function, visualize the location and motion of the sesamoids. Have the patient positioned on their side and obtain a lateral view of the foot with the sesamoids clearly visible. On static X-ray, proximal migration of the sesamoids may be visible. To assess under fluoroscopy, take images with the great toe at neutral, then apply dorsiflexion stress to the great toe keeping the foot and first metatarsal static. The normal sesamoid function is distal migration with dorsiflexion of the great toe. When there is a plantar plate tear, the sesamoids will not move distally and either stay in place or move proximally.[7]
Complications
There are few complications, most being with procedures such as fluoroscopic guided injections. Infection is a risk as well as damage to nearby anatomic structures. There are specific structures with each type of injection to be avoided. For injection of the interphalangeal and metatarsophalangeal joints, the extensor tendons need to be avoided as they could become weakened with multiple needle sticks.
When injecting the tarsometatarsal joints, one must avoid the dorsalis pedis artery with the first, second, and third TMT joint injections. The posterior, middle, and anterior subtalar joint facets are approached from lateral, and the clinician must avoid the peroneal tendons as they can be damaged from needle sticks.[12]
Clinical Significance
Using fluoroscopy, the clinician can confirm and document the precise locations of the injections. Lucas et al. did a prospective study where patients underwent fluoroscopic guided injections in the foot and ankle and found that it improved clinical confidence with diagnosis and could help determine subsequent treatment.[9]
In another retrospective review study, intraarticular fluoroscopic injections were done in patients to help identify a source of pain before surgery. This helped the treating physician identify the source of pain and lead to good arthrodesis outcomes in the majority of their patients.[15] Fluoroscopy can identify plantar plate tear; this is clinically significant because it requires timely surgical repair to prevent complications such as loss of push-off strength in gait and cock-up toe.[11]
Enhancing Healthcare Team Outcomes
Podiatric fluoroscopy is a useful tool for the identification of injuries and diagnostic or treatment injections. Communication with the patient on the positioning is important, and it is beneficial to have an assistant to help during injections. Healthcare team outcomes are enhanced with good interprofessional communication between nurses, clinicians (including mid-level practitioners), and X-ray technicians. These teams must coordinate to limit radiation exposure and obtain proper imaging. Using fluoroscopy in the clinic as well as intraoperatively has shown to help with clinical diagnosis and prediction of postoperative alignment. When done properly with a coordinated team, fluoroscopic radiographs have been shown to have high reliability.[8] [Level 2]
Nursing, Allied Health, and Interprofessional Team Interventions
Health Professionals such as X-ray techs should maintain their equipment to ensure accuracy and safety. All members of the interprofessional team should maintain a safe environment by keeping the furthest distance from the radiation source and limiting the exposure time to all team members.
Nursing, Allied Health, and Interprofessional Team Monitoring
Proper monitoring by both the X-ray tech and surgeon should be done to ensure limited radiation exposure. All team members should be monitored to make sure they have proper protective lead aprons and thyroid shields and maintain the furthest distance possible from the radiation source.