Continuing Education Activity
A slit lamp is the most common ophthalmic equipment used by ophthalmologists in daily clinical practice. It is an essential instrument in the ophthalmologist armamentarium. Slit lamp not only provides a magnified view of intraocular structures (anterior and posterior segment) but also help in qualitative and quantitative analysis of various parameters such as corneal endothelial cell count, corneal thickness, anterior chamber cells, and flare assessment, depth of anterior chamber, pupil size, grading of cataract, slit lamp photography, etc. The term slit lamp is a misnomer since the slit is just one component of the instruments which provide slit apertures. A slit lamp consists of an observation system, an illumination system, and a mechanical support system. This activity covers the various methods of slit lamp illumination used to diagnose various ocular conditions.
Objectives:
- Describe the parts of a slit lamp.
- Summarize the clinical significance of a slit lamp.
- Outline the various uses of a slit lamp.
- Explain the illumination techniques with a slit lamp.
Introduction
A slit lamp is an optical instrument with a high-intensity illumination source that can project as a slit.[1] It is a stereoscopic biomicroscope from which a focussed beam of light is projected with variable length, angle, and breadth.[2] It helps to visualize the three-dimensional anatomical details of the adnexa and the anterior segment.[3] The posterior segment can also be visualized using a +90 D or +78 D lens. Various accessory devices can also be used with the slit lamp.[1]
These devices can be used to perform gonioscopy, pachymetry, applanation tonometry, ophthalmodynamometry, anterior segment imaging, slit lamp videography, laser interferometry, Nd YAG laser capsulotomy, YAG peripheral iridotomy, panretinal photocoagulation, laser interferometry, and potential acuity meter test.[4] The slit lamp aids in the comprehensive ophthalmic evaluation of all patients and assesses the minutest anatomical details to reach a particular diagnosis.
Slit lamps are available in emergency departments, ophthalmic casualty departments, general ophthalmic wards, ophthalmic theatres, and the specialist chamber.[5] It is invaluable for diagnosing and understanding common ophthalmic complaints and ocular diseases and linking ocular pathologies with systemic diseases. Perfect examination with a slit lamp takes time to master. However, basic understanding and workup can be easily done by medical students, general practitioners, and emergency medicine healthcare providers.[6]
The various parts of the slit lamp are the observation system, illumination system, and mechanical support system. A perfect slit lamp examination requires the correct technique of examination, which involves patient adjustment, instrument adjustment, and proper illumination techniques.[7]
The various methods of illumination are diffuse illumination, direct focal illumination, indirect illumination, retro illumination, specular reflection, sclerotic scatter, and oscillating illumination of Koeppe. The current activity gives insight into parts of a slit lamp, examination technique, illumination techniques, indication, and use of accessory devices from slit lamps.[8]
Anatomy and Physiology
The base of Slit Lamp
- Adjustable table
- Power switch
- Rheostat
- Joystick (for all three axes)
- Locking knob (X-Y plane)[9]
Patient Support Framework
- Forehead rest of the band
- Chin rest
- Chin adjustment knob
- Patient support handles
- Canthus indicator[10]
Viewing Arm (Swivel)
- Eyepiece
- Magnification control knob
Illumination Arm (Swivel)
- Light source
- Filters for illumination
- Beam height adjustment
- Slit illumination
- Beam width adjuster
- Center screw[7]
Indications
A total of Seven Basic Slit Lamp Illumination Techniques are Used to Examine the Eye
Diffuse Illumination
In this technique, the angle between the illumination beam and microscope is kept at 30 to 45 degrees. The slit width is maintained as the widest, diffuse filter illumination; magnification should be low to medium, and illumination is controlled from medium to high.[11]
Uses
- Gross examination of the anterior segment of the eye
- Examination of the sclera, upper tarsal, lower tarsal, and palpebral conjunctiva
Direct Focal Illumination
In this technique, the slit lamp beam is modified until it coincides with the correct focus of the microscope. The illumination is kept as a narrow slit at an oblique angle. The corneal and the lens tissue disperse light and become visible as bright objects against the dark background. The technique of direct focal illumination has three subcategories of examination.[12]
Conical Beam
In this technique, the slit beam is kept as a small circular pattern, the light source is at 45 to 60 degrees, and the beam is directed into the pupil. The slit lamp biomicroscope is kept in front of the eye, and magnification is high with 16-20 X. The focusing beam is between the cornea and the anterior lens surface, and a dark zone is usually noticed between the cornea and the lens. This zone appears black and is generally optically empty. The aqueous flare makes this zone turbid, and anterior chamber cells are seen as white dots. The cells are located by gently moving or oscillating the beam.[12]
Uses
The conical beam is used to see aqueous cells and flare.
Parallelopiped
This corneal section is observed using a 2 to 3-mm wide focussed slit.
Uses
- Pathologies of corneal epithelium and stroma.
- Corneal scar or infiltrate (because of higher density than the surrounding
- Cells and flare in the anterior chamber[13]
Optical Section
This section is produced by a very narrow slit lamp beam focussed obliquely. The optical section produced appears like a knife on the histological section.
Corneal Optical Section
- This consists of a segment of the arc with concentric zones.
- The tear film layer is observed as a bright anteriormost layer
- Epithelium appears as a dark zone below the tear film
- The Bowman's layer is seen as a bright white layer
- Stroma appears as a widened granular and gray layer
- Descemet and endothelial layers appear as bright zone posteriorly[14]
Uses
- This helps in delineating the cornea, lens, and anterior vitreous face
- Corneal thickness
- Corneal curvature
- Corneal foreign body depth and location
- Anterior chamber angle grading- Van Herrick method[15]
Lens Optical Section
- The lenticular layer can be seen stratified as
- Anterior lens capsule
- Subcapsular clear zone
- Scattering zone of discontinuity which appears as bright
- Second cortical clear zone
- Deeper cortex clear zone
- Nuclear area[16]
A slit beam is used progressively to focus on the deeper layers of the lens. This optical section can also delineate the anterior one-third of the vitreous face.
Indirect Illumination
In this, the slip lamp light is focussed adjacent to the area to be examined. The angle between the slit-lamp light source and the viewing arm should be between 30 to 45 degrees. A moderate-width beam is used, and illumination can be set as low, medium, or high based on the need. The indirect illumination examines corneal infiltrates, corneal microcysts, vacuoles, or epithelial cells.[12]
Retroillumination
In this technique, the microscope is focused on the cornea, while the light is reflected from the iris or the retina. Retroillumination has been further classified as direct or indirect.[17]
Direct Retroillumination
In this, the observer is in the direct path of the light reflected from the ocular structures. The pathology is focused on an illuminated background.[3]
Indirect Retroillumination
In this method, the observer is at a right angle to the observed pathology or ocular structure. The pathology is seen against a dark, non-illuminated background.
The pathologies can be divided based on the optical properties as obstructive, dispersive, or refractile.[3]
Obstructive
These are seen as dark objects against a bright background: Eg, blood vessels.[3]
Respersive
These scatter the light and do not obstruct the light completely. The pathology is seen as a bright object against a dark background: Eg, epithelial edema and keratic precipitates.
The infiltrates are seen as relucent by direct focal illumination, but on retro illumination, they appear as respersive.[3]
Refractile
The difference in the refractive indices between the pathology and the surroundings is seen as distortion from the junction between the illuminated and dark areas—e.g., vacuole. A solid or opaque precipitate usually appears as a dark area under direct retro illumination, but the illumination is reversed in indirect illumination. Retroillumination helps provide details of an object related to the pathology and gives an idea regarding the refractive index and the form and consistency of the pathology.[3]
Fundus Retroillumination
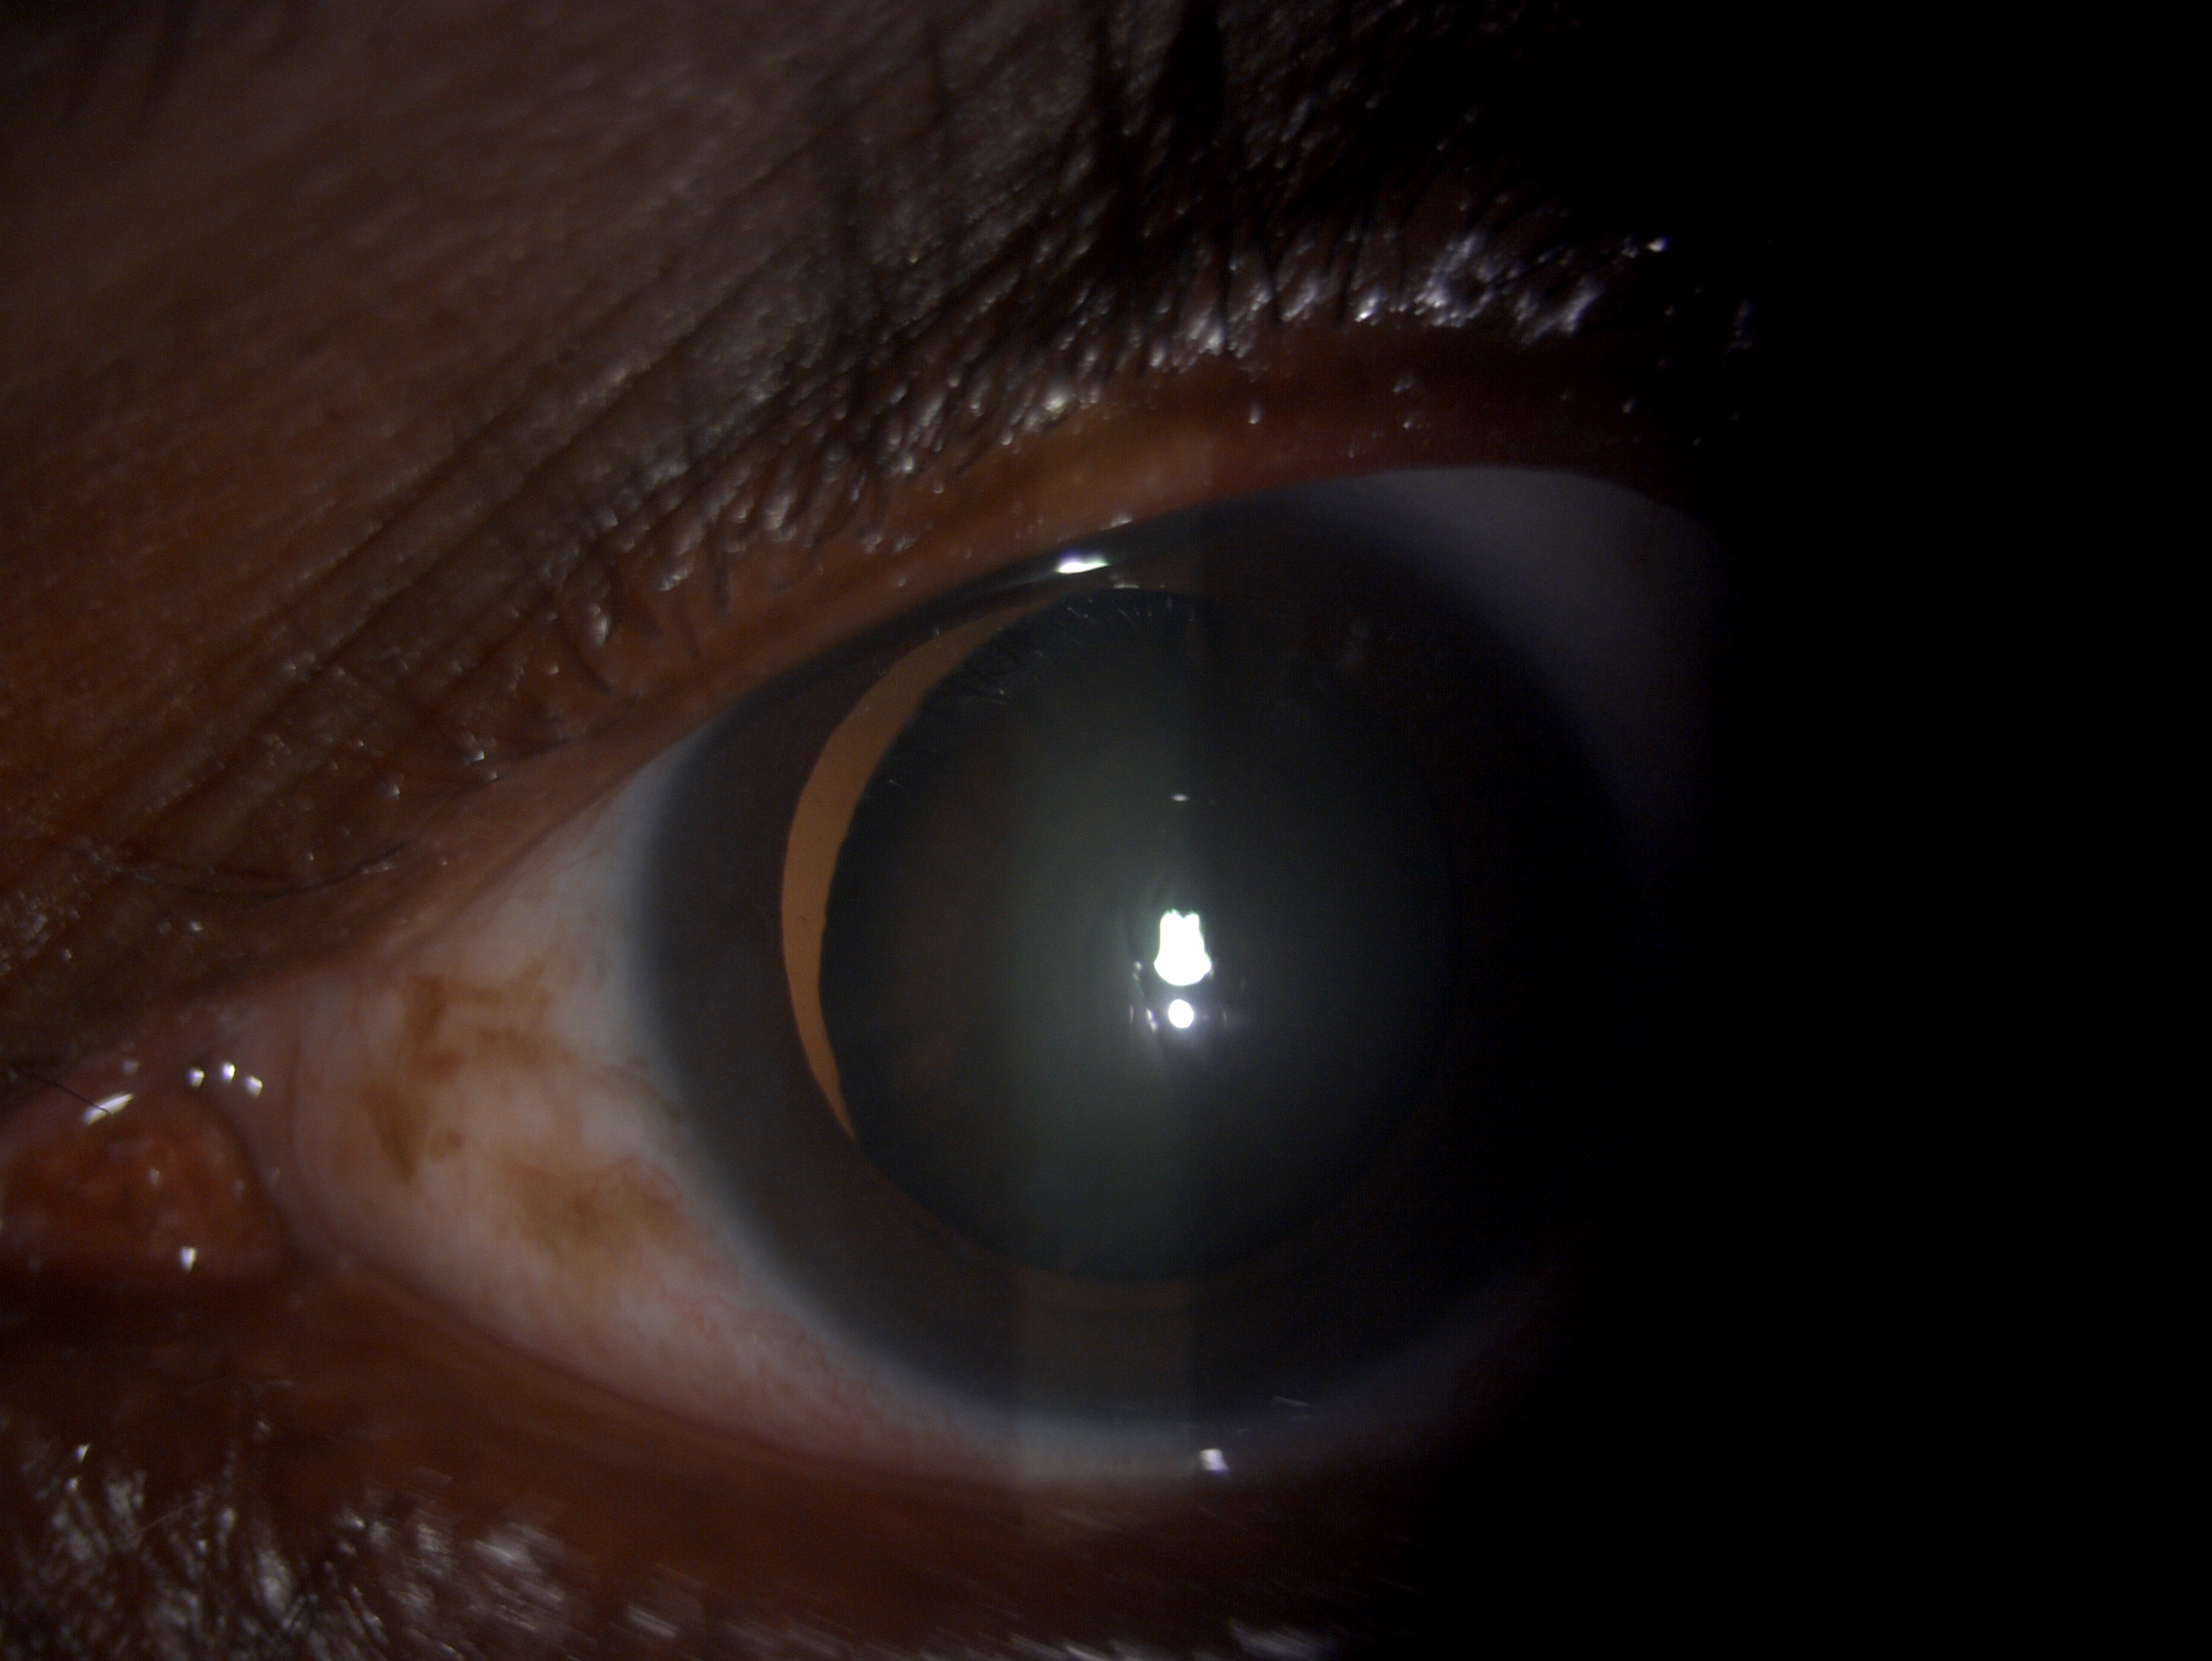
In this technique, the first pupil is dilated, and the slip lamp beam and the microscope are kept co-axial. This technique helps in assessing the media clarity and opacities. The principal is that when the light passes through the pupil and strikes the fundus, it creates a glow posterior to the opacity in the media. Hence, the media opacity creates a shadow. Under high magnification (10 to 16X), the microscope is focused on delineating the pathology. This technique is also helpful in assessing the cornea, lenticular or vitreous pathology. An important application is to grade cataracts, especially the cortical and posterior subcapsular ones, using the LOCS 2 and 3 classification (lens opacity classification system).[3]
Specular Reflection
A light reflection occurs when a light beam strikes an optical surface, called a zone of discontinuity. These zones can be observed in the cornea as well as the lens. When an observer is kept in the pathway of reflective light, a glittering reflex will be seen, called specular reflection. The reflected surface is called the zone of specular reflection.
Pathologies on the ocular surface can scatter the light and, in turn, create dark areas in the reflex beam. For obtaining a specular reflex, the patient is instructed to look 30 degrees temporally while the light beam is focused from the opposite side. The optical block is focussed under higher magnification at a distance of 3 to 4 mm from the limbus. A shining reflex is observed on the cornea from the light source.
The optical block will approach the reflex as the light source is moved temporally. When the angle between the slit and microscope is 60 degrees, the angle of incidence is equal to the angle of reflection. At this stage, the reflex shows irregulates at the meniscus. The deeper, less illuminated glow will be seen, focussed on showing the endothelial mosaic of cells. With this technique, the endothelial cells can be counted and measured.
Sclerotic Scatter
This technique is used to locate even the smallest and faintest corneal irregularities. The light ray is directed towards the limbus. Because of total internal reflection, the light rays are passed through the cornea and illuminate the opposite side of the limbus. In the case of corneal opacity, the details become visible because light rays are scattered. A magnification of 6 to 10 X is used.[3]
Oscillating Illumination of Koeppe
In this technique, the slit lamp is given an oscillatory movement by which it is easy to detect filaments or minute objects in the aqueous, which can easily escape detection.[3]
Equipment
Slit Lamp Parts
There are three essential parts of a slit lamp
- Observation system
- Illumination system
- Mechanical support system[7]
Observation System/ Microscope
The observation system is a compound microscope system with two optical components: the objective and the eyepiece. This helps in getting an enlarged image of the near object. The slit lamp is designed to have a long working distance, which is the distance between the patient eye and the microscope objective.[18]
Objective Lenses
It has two plano-convex lenses with the convexities close together, giving a total power of +22D.[19]
Eyepiece Lenses
It has a power of +10 D. To provide good stereopsis, the tubes converge at 10 to 15 degrees.[9]
Prisms
There are a pair of prisms. The primary function of prisms is to reinvert the image produced by the objective and the eyepiece.[20]
Magnification System
The magnification of modern slit lamps varies from 6X to 40X. These slit lamps use the following systems to produce a magnified image.[7] This includes the following:
Czapskiascope with Rotating Objective
This is an ancient and frequently used technique for obtaining different magnifications. The objectives are different and are placed in the turret type of arrangement that allows them to be reasonably rapidly changed during the examination. This is employed in the Haag-StrBauschthe, Bausch and Lomb, and Thorpe types of slit lamps.[21]
Littman Galilean Telescopic Principle
The Galilean magnification telescope was developed by Litmann (1950); it is an entirely different optical system positioned between the objective and the eyepiece and does not require any change in both. The telescope provides a good range of magnification of a factor of 5 through a current arrangement within the microscope body. This is called the Galilean system because it utilizes the Galilean telescope to change the magnification. The telescope has two components a positive lens and a negative lens. This fits within the standard slit lamp microscope, a relay lens (R), and the prism erector (P). The Zeiss slit lamp, the Rodenstock, and the American optical slit lamps used the Littman Galilean telescopic principle.[9]
Zoom System
A few slit lamps are equipped with a zoom system that helps in a variable degree of modification. The Nikon slit lamps contain an objective zoom system and offer a range of magnifications of 7 to 35X.[1]
Illumination System
The Gullstrand illumination system provides a bright, diffusely illuminated, fine focussed slit of light at the eye. It is composed of the following components.[22]
Light Source
The light source is a Nernst lamp, followed by Nitra lamps, arc lamps, mercury vapor lamps, and halogen lamps. It gives illumination of 2x10 to 4x10 lux.[12]
Condenser Lenses
These are two plano-convex lenses with the convex surface in opposition.[23]
Slit and Diaphragms
The height and width can be changed based on the two knobs provided for this purpose. Moreover, two stenopaeic slits are 2 mm and 0.5 mm to provide a conical light beam. There is also a facility to rotate the slit from the vertical meridian and tilt the projection system from the horizontal axis. This assists in examining the fundus and the angle of the anterior chamber.[24]
Filters
The illumination beam is provided with different kinds of filters. The cobalt blue and red-free filters are provided in most models.
Projection Lenses
These lenses help in forming the image at the slit of the eye. The diameter of the lenses is small. These lenses have two advantages: first, they help in keeping the aberration of the lenses down, which forms a good quality image, and second, it helps in increasing the depth of the focus of the slit and improving the optical section of the eye.[3]
Reflecting Mirrors or Prisms
These form the last part of the reflecting mirror. The illumination system of the slit lamp has to pass from one area of the microscope to the other. To make this possible, the projection system is set along a vertical axis, with the mirror or prism reflecting the light along the vertical axis. The narrow prism or mirror, whenever necessary, such as while examining the fundus, the illumination axis can be made to coincide with the viewing axis.
Optics of the Illumination System
The Koeller illumination system has been incorporated into the slit lamps. Optically it is similar to a 35 mm slide projection except for the variable aperture slit, and the lens has a much shorter focal length. The filament light source and the condenser lens, or the projection lens, form the image of the slit in the patient's eye.[3]
Mechanical Support System
The various features of mechanical support system can be
Joystick
Microscope movement and the illumination system movement near or far from the eye and from side to side are usually achieved with the joystick arrangement.[7]
Up and Down Movement
The up-and-down movement can be obtained through a screw device that helps move the illumination and viewing system up and down compared to the chin rest.[7]
Patient Support System
It has a mobile vertical chin rest, and the table height is adjustable to accommodate patients of all sizes.[25]
Fixation Target
The fixation target facilitates the examination under the majority of difficult scenarios.
Mechanical Coupling System
This system supports and helps in coupling the microscopic system and the illumination assembly along the central axis of rotation that overlaps with their focal planes. This arrangement helps by providing light at the target where the microscope is focused. It also ensures microscope should rotate along the axis without a change of focus.
The coupling of the microscope and the illumination system has the advantage while employing the slit lamp for regular examination of the eye's anterior segment. However, when gonioscope or fundus lenses are used, this can be of a significant disadvantage since the slit and the microscope optic does not reach an appropriate focal point under these conditions, the observer suffers either the suboptimal quality of images or needs to refocus the eyepieces for obtaining a good quality image.[3]
Personnel
The slit lamp is maintained in perfect working condition by the slit lamp technicians and paramedical staff. Optometrists and ophthalmologists use the slit lamp for examining patients and performing other vital investigations.[26]
Preparation
There are no special preparations required to perform a routine slit lamp examination. For fundus evaluation, the surgeon needs to dilate the patient's eye; for applanation, tonometry, and gonioscopy, topical anesthetic should be put in the eye, and the procedure should be explained to the patient. The patient should also explain visual blurring post-dilatation and the need to wear sunglasses.[27]
Slit Lamp Maintenance
A cloth that is free of lint can be moistened with alcohol and is used to clean the chin rest, head rest, hand holder, and adjustable table. The paper strips used at chin res should be replaced after each examination. The fundus lenses, gonio lenses, and prisms should be cleaned with water, soap, or alcohol-based solution and air dried.[28]
Technique or Treatment
Technique of Biomicroscopy
The following points must be kept in mind while performing routine microscopy.[2]
Patient Adjustment
The patient should be made to sit comfortably on an adjustable height chair to enable them to place their chin easily on the chin rest. The forehead of the patient should be touching the headrest.[21]
Instrument Adjustment
The slit lamp height should be adjusted based on the patient's height. A fixation target should be given to the patient at eye level. The illumination system and the microscope should be adjusted with the patient's eye for examination.[2]
Slit Lamp Examination
A few important are to be kept in mind while performing slit lamp examination. The examination must be carried out in a semi-dark room so that the examiner's eyes are dark adapted so that the eye is sensitive even with low light intensity. The illumination should be diffused for short a time as possible. The retina should be exposed to ambient light for a minimum period. The medications like ointments and topical anesthetics produce corneal surface disturbance, which can be taken wrongly as pathology. First, the pathology should be located in low ambient illumination, and later higher magnification should be used to examine it.[7]
Complications
Various complications have been reported while performing slit lamp examination.
- Conjunctival abrasion
- Conjunctival tear
- Corneal tear
- Corneal abrasion
- Corneal perforation
- Vasovagal syncope
- Bleeding
Clinical Significance
The slit lamp is a precious instrument and helpful for examining gross pathologies, media opacities, contact lens fitting, localizing subtle findings like nerve fibers, Vogt's striae, blood vessels, cataracts, infiltrates, optical coherence tomography, fundus fluorescein angiography, dry eyes, an anterior and posterior segment of the eye. It is an indispensable tool for reaching a particular ocular diagnosis.[3]
Enhancing Healthcare Team Outcomes
The slit lamp biomicroscope is a vital tool in any ophthalmologist's armamentarium. It helps in a detailed examination of the anterior and posterior segments and picks up subtle findings to reach a particular diagnosis. It also aids in examination with various accessory devices. A routine slit lamp examination requires combined efforts of ophthalmologists, nursing staff, optometrists, and ophthalmic technicians to diagnose and manage ocular pathologies.[3]
Nursing, Allied Health, and Interprofessional Team Interventions
The nursing, allied health, and interprofessional team help correct the slit lamp defects such as fused bulbs, loose or stuck joystick, loose locking knob, loose wires, and misalignment of prisms and lenses.[29]
Nursing, Allied Health, and Interprofessional Team Monitoring
The nursing, allied health, and interprofessional team help monitor the patients being examined on slit lamps, help the patient with proper positioning and comfort, and maintain decorum during the examination. They also help monitor patients for pain and systemic signs such as vasovagal syncope and avoiding excess pressure on the slit lamp.[29]